5 Best Blenders for Crushing Ice (October 2026)
The best blenders for crushing ice include the Ninja Professional Plus BN701 for frequent frozen drinks, the Ninja Blender Pro+ BL660 for shared and solo drinks, and the Ninja Professional Blender BL610 for manual batch blending.
On this page (7 sections)
- Which blender is best for crushing ice?
- How do you choose the best blender for crushing ice?
- How should you set up a blender for frozen drinks?
- How can you control frozen-drink texture?
- Which ice-crushing mistakes should you avoid?
- How do you clean and care for an ice-crushing blender?
- Which ice-crushing blender should you choose?
The Ninja Professional Plus BN701 is the best blender for crushing ice for most households making frozen drinks in batches. Its timed programs suit frequent use, while the BL660 is the better fit when you also want individual drinks to take along.
Start with your usual serving size and preferred controls. Those choices separate these models more clearly than choosing the highest motor number.
If breakfast blends are part of your routine, compare the best blenders for smoothies. Our complete blender guide covers other blender types, and the blender wattage guide explains motor figures in more detail.
Our picks at a glance
-
1
-
2

-
3

- 4
 Check it
Ninja Professional Blender 2.0 BR201AMZ
Best for mixed control preferences - 5
 Best for fewer control choicesCheck it
Which blender is best for crushing ice?
The BN701 leads for preset-led pitcher blending, while the BL660 earns its place through included personal cups. Choose among the remaining models by how you want to control the blend, rather than expecting one motor figure to settle the decision.
FresherHouse compared the supplied motor specifications, ice-crushing systems, container choices, controls and cleaning requirements. The recommendations focus on buyer fit; they don't establish a measured ranking of ice texture, blending speed or noise.
All five choices are full-size Ninja models with plastic pitchers. If you want a different brand, a glass container or a much smaller appliance, use the broader guides linked above before narrowing your choice.
| Product | Best for | Power | Pitcher | Controls | Our score |
|---|---|---|---|---|---|
| Ninja Professional Plus BN701 | frequent frozen drinks | 1400 peak watts | 72 oz, 64 oz max liquid capacity | Three Auto-iQ presets | 9.2 |
| Ninja Blender Pro+ BL660 | shared and solo drinks | 1100 watts | 72 oz, 64 oz max liquid capacity | Three speeds, pulse and single-serve function | 9.0 |
| Ninja Professional Blender BL610 | manual batch blending | 1000 watts | 72 oz, 64 oz max liquid capacity | Four speeds | 8.8 |
| Ninja Professional Blender 2.0 BR201AMZ | mixed control preferences | 1200 watts | 72 oz, 64 oz max liquid capacity | Four manual settings and Crush Auto-iQ | 8.5 |
| Ninja UltraCrush BP201 | fewer control choices | 1000 watts | 72 oz, 64 oz max liquid capacity | Low, High and Max | 8.1 |
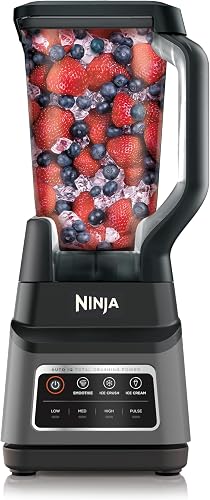
Ninja Professional Plus BN701: Best for frequent frozen drinks
- 1400 peak watts
- Total Crushing blades
- Three Auto-iQ presets
- 72 oz pitcher with 64 oz max liquid capacity
Choose the BN701 for pitcher batches when you want timed programs to manage pulsing and pauses. It suits a household that makes frozen drinks often and doesn't need included personal cups.
Pros
- Three Auto-iQ programs manage timed blending
- Full-size pitcher for shared drinks
- Top-rack dishwasher-safe pitcher and blade assembly
Cons
- No personal cups included
- Extra preset choices offer less value if you prefer manual blending
Choose the BN701 for frequent frozen drinks when you want the blender to manage a timed cycle. Its three Auto-iQ presets combine pulsing, blending and pauses, so you don't have to decide every start and stop yourself.
The motor is rated at 1400 peak watts, paired with Total Crushing blades. That peak figure isn't a like-for-like basis for declaring it stronger than every other choice here.
Its pitcher has a total capacity of 72 oz, with a 64 oz maximum liquid limit. The difference matters when making drinks for several people: leave the required space rather than filling to the rim.
This is the most suitable pick here for a household that returns to pitcher recipes throughout the week and values preset choices. It also fits hosts who prefer to focus on measuring and serving instead of manually timing each blend.
Skip it if portable single servings are your main use. No personal cups are included, and extra programs add little value if you already prefer to judge texture and control blending yourself.
Ninja Blender Pro+ BL660: Best for shared and solo drinks
- 1100 watts
- Total Crushing blades
- 72 oz pitcher
- Two 16 oz to-go cups
The BL660 fits households that switch between shared pitcher drinks and individual blends. Two personal cups with spout lids add portability, while manual controls let you choose the blending time.
Pros
- Two 16 oz personal cups with spout lids
- Three manual speeds plus pulse and single-serve function
- BPA-free, top-rack dishwasher-safe removable parts
Cons
- No timed Auto-iQ programs
- Cups, lids and separate blade assembly need storage
Choose the BL660 for a mix of shared and individual drinks. It includes two 16 oz cups with spout lids and a separate Pro Extractor Blades assembly, giving those smaller servings their own container.
That setup is useful when one person wants a different recipe or needs a drink to take along. You can blend in the cup instead of making every small serving in the large pitcher and transferring it.
The BL660 combines an 1100-watt motor with Total Crushing blades. Three manual speeds, pulse control and a dedicated single-serve function give you direct choices rather than timed Auto-iQ cycles.
Buy it because you'll use both container formats, not simply because more pieces are included. Cups, lids and the separate blade assembly need a place to dry and a cupboard space between uses.
Skip it if you want automated pitcher cycles or only make shared batches. Also follow the cup's own recipes and fill limits: having ice-crushing blades in the pitcher doesn't make every pitcher recipe suitable for the cup.
Ninja Professional Blender BL610: Best for manual batch blending
- 1000 watts
- Total Crushing technology
- 72 oz pitcher
- Four speeds
The BL610 suits buyers who want to make pitcher drinks and choose the blending speed themselves. Its setup centers on family batches without personal cups or timed Auto-iQ programs.
Pros
- Full-size pitcher for family batches
- Four speeds for manual blending
- BPA-free, top-rack dishwasher-safe pitcher
Cons
- No timed Auto-iQ programs
- No personal cups included
Choose the BL610 for manual pitcher blending when cups and preset routines aren't part of your plans. Its 1000-watt motor, Total Crushing technology and four speeds cover the basic feature set for this type of full-size blender.
It fits someone who wants to watch the drink change and stop at the preferred texture. You choose the speed and duration, which suits recipes where you add ingredients gradually or make small adjustments between runs.
The included setup centers on the pitcher, lid and recipe guide. That makes it a sensible shortlist choice if you already have drinking bottles and don't want more cup accessories to store.
Its BPA-free pitcher is top-rack dishwasher-safe. Check the manual separately for blade care rather than assuming every piece follows the pitcher's cleaning instructions.
Skip it if you want a cycle to manage the blending pattern for you. It also offers little reason to choose it for portable drinks when the BL660 includes cups designed for that routine.
Ninja Professional Blender 2.0 BR201AMZ: Best for mixed control preferences
- 1200 watts
- Crush Auto-iQ program
- Low, medium, high and pulse settings
- 72 oz pitcher
The BR201AMZ fits a household where some people want a preset and others prefer direct control. A dedicated Crush cycle sits alongside manual settings for adjusting texture.
Pros
- Dedicated Crush Auto-iQ program
- Low, medium, high and pulse controls
- Top-rack dishwasher-safe containers, lids and blades
Cons
- No personal cups included
- One Auto-iQ preset compared with the BN701's three
Choose the BR201AMZ when your household wants both preset and manual control. Its dedicated Crush Auto-iQ program provides a timed pattern for frozen ingredients, while low, medium, high and pulse settings let you make your own adjustments.
That combination suits a shared kitchen where one person prefers a repeatable button choice and another wants to control texture. You don't have to use the automated cycle for every recipe.
The model pairs a 1200-watt motor with stacked Total Crushing blades. Its pitcher has a pour spout, and the included quick-start guide provides 10 recipes to help establish workable ingredient proportions.
Start with a suitable guide recipe before changing several ingredients at once. Keeping the starting recipe consistent makes it easier to work out whether a drink needs less ice, more liquid or a shorter final blend.
Skip it if you want included personal cups or several Auto-iQ program choices. Its strongest reason to buy is the combination of one dedicated Crush cycle and direct manual settings.
Ninja UltraCrush BP201: Best for fewer control choices
- 1000 watts
- Total Crushing technology
- Low, High and Max speeds
- 72 oz pitcher
The BP201 suits buyers who want a short set of manual speed choices for pitcher drinks. Skip it if a timed program, dedicated pulse control or included personal cups matters to your routine.
Pros
- Three direct speed choices
- Full-size pitcher for shared drinks
- BPA-free, dishwasher-safe parts
Cons
- No timed Auto-iQ programs
- No dedicated pulse setting among the three speed choices
Choose the BP201 if fewer control choices appeal to you. Its Low, High and Max speeds offer a short manual menu for someone who doesn't want to choose among timed programs.
A 1000-watt motor and Total Crushing technology form its ice-focused setup. Like the other pitcher-only choices here, it fits shared frozen drinks more naturally than a routine built around blending in a take-along cup.
The trade-off is control style. There is no dedicated pulse choice among those three speeds, so choose another model if brief, deliberate bursts are central to how you want to prepare drinks.
Its BPA-free parts are dishwasher-safe, but use the manual to confirm placement and any part-specific care. Keep enough drying space available for the pitcher and blade assembly instead of leaving them piled in a sink.
Skip it if you want preset timing or a dedicated pulse control. Pick it for the simpler control menu, not for an assumed advantage over another model with the same motor wattage.
How do you choose the best blender for crushing ice?
Choose by serving size, container type and control style, then check the ice instructions and storage fit. These decisions determine how useful the blender will be on an ordinary day.
A feature only earns its place if it solves part of your routine. A cup you use every morning can matter more than another program, while a preset can matter more than accessories that stay in a cupboard.
What makes the best blender for crushing ice fit your routine?
Match the blender to what you actually want to serve: loose crushed ice, a pourable frozen drink or a thick fruit blend. Those jobs use ice differently, so begin with a recipe and method suited to the result.
For loose ice, the goal is broken pieces without unnecessary melting. For drinks, the goal is enough circulation to combine ice with the other ingredients rather than leaving hard pieces in a thin liquid.
If nearly every batch is one drink, question whether you need a large pitcher as your main container. The best personal blender guide helps you compare a smaller format before committing to a batch-focused setup.
How much usable pitcher space do you need?
Use the marked liquid limit and recipe instructions, not the container's total volume, to plan a batch. All five pitchers here share the same total capacity and maximum liquid capacity noted above.
Decide how many glasses you normally fill, then compare their combined volume with a suitable recipe yield. Ice and fruit occupy space too, so a large-looking empty pitcher can fill quickly.
For occasional guests, making two manageable batches can be easier than pushing one batch to its limit. Keep ingredients measured and cold so the second round doesn't require starting the preparation again.
Should you choose preset cycles or manual controls?
Choose presets for a guided blending pattern and manual controls when you want to decide the duration and texture. Presets still depend on the right load, so they don't remove the need to measure ingredients.
Manual control is useful when you want to stop, inspect and make a small recipe adjustment. It asks for more attention because you decide when the drink is ready.
Think about who else will use the blender. A household that disagrees about automation may get more value from a model offering both approaches than from the shortest control menu.
How much should motor power influence the choice?
Treat motor wattage as one part of the comparison, alongside ice suitability, container design and controls. A bigger number doesn't tell you how evenly a particular recipe will circulate.
Peak power describes a different measure from a figure without that label. These specifications don't support calculating a percentage advantage in ice-crushing performance between models.
An overloaded pitcher can also struggle despite a large motor figure. Choose a suitable machine, then give it a recipe and batch size that allow ingredients to move.
What should you check before making counter space?
Measure the storage location and allow room to lift off the lid and remove the pitcher. A blender that fits beneath a cabinet may still need to move forward before you can load it.
Account for the whole routine: ingredients beside the base, space to pour and somewhere for washed parts to dry. For more help weighing these practical details, use our guide to how to choose a blender.
If you plan to put the blender away after each use, consider the effort of moving the base and storing loose accessories. Included cups are useful only if you can keep their matching lids and blade assembly accessible.
How should you set up a blender for frozen drinks?
Set up on a dry, level surface, wash the permitted removable parts and read the container-specific instructions before your first batch. Correct assembly matters as much as choosing the right button.
Start with the supplied recipe guide or another recipe approved for your model. It gives you a workable starting point for ingredient amounts and order.
Check assembly before adding ingredients
With the base unplugged, inspect the pitcher, lid and blade assembly for visible damage. Don't use a cracked container or damaged component, especially with hard ingredients.
Install the blade assembly, pitcher and lid exactly as directed. Keep handles and any locking marks in their required positions rather than forcing a lid or container that doesn't seat correctly.
Follow the manual's loading order, since pitcher and personal-cup instructions can differ. Use only the container's permitted ingredients and keep within all marked limits.
Separate frozen cubes before loading
Break up clumps of ordinary water ice before adding them, using a suitable method outside the blender. Don't treat a large fused block as interchangeable with separate cubes.
Use the ice size and quantity allowed by the manual. Larger pieces and tightly packed frozen ingredients can leave less room for movement.
Keep utensils out of the container during operation. If ingredients need to be moved, stop, unplug and follow the manual's clearing procedure before doing anything inside the pitcher.
How can you control frozen-drink texture?
Control texture through ingredient proportions, short checks and small adjustments. Longer blending isn't the answer to every problem, especially when a drink already contains too much liquid.
Ice adds both coldness and water. As it breaks down and melts, it changes thickness and flavor, so consider the whole recipe before adding another handful.
For a pourable frozen drink
Begin with the recipe's balance of ice, liquid and other ingredients. Enough liquid helps ingredients move, but too much can turn a slushy drink into a thin one.
Once the permitted cycle or blending step finishes, stop and check the texture. If it needs adjustment, change one thing at a time so you can repeat the result.
Serve promptly after reaching the texture you want. Leaving a finished frozen drink beside the blender allows the ice to melt and the mixture to thin.
For a thicker fruit blend
Use the recipe's frozen fruit and ice amounts rather than assuming extra ice always improves thickness. More ice also adds water as it melts and can weaken the flavor.
If ingredients stop circulating, don't keep extending the run. Stop and follow the manual's instructions for redistributing the load or adjusting the recipe.
Add permitted liquid in small amounts when needed. A large pour may restore movement but leave you with a much thinner drink than you wanted.
For crushed ice to add to drinks
Use a dry-crushing method only when your model permits it. Follow its specified quantities and control sequence rather than borrowing instructions from another blender.
Stop at the texture you need instead of continuing toward the finest possible result. Coarser pieces and snow-like ice behave differently in a glass, so choose the texture for the drink you're serving.
Prepare crushed ice close to serving time. Fine pieces can melt or clump while sitting, which changes how easily you can portion them.
Which ice-crushing mistakes should you avoid?
Avoid overloading, forcing stalled ingredients and treating all containers alike. Most recipe adjustments should happen with the blender stopped, not by continuing to run a load that isn't moving.
A timed program is a starting method, not permission to ignore unusual movement, leaks or signs that something is wrong. Stay nearby while the blender operates.
Adding more ice to every thin drink
Check the liquid proportion before adding more ice. A drink can be thin because it started with too much liquid or sat too long after blending.
Repeated additions can also fill the pitcher beyond its permitted load. Adjust the next batch's recipe instead of trying to rescue an overfilled container.
Running continuously when ingredients stop moving
Stop if the contents stop circulating or the appliance behaves abnormally. Switching to a higher setting doesn't correct every blocked or overloaded mixture.
Unplug before clearing ingredients, and follow any cooling or restart instructions in the manual. Never reach around an installed blade assembly to dislodge a piece of ice.
Using the cup like a miniature pitcher
Follow separate instructions for personal cups, including ingredient order and fill marks. Their shape and blade arrangement differ from the large pitcher.
Don't scale a large recipe down by guesswork and assume the same program or ice proportion applies. Start with a suitable cup recipe, then make modest changes within the permitted limits.
Expecting quieter operation from a lower wattage number
Don't choose between these models based on an assumed noise advantage from motor wattage. The supplied specifications don't establish a noise ranking.
Crushing hard ice is a noisy task in general. Plan where and when you'll blend if sleeping household members or nearby work calls are part of your routine.
How do you clean and care for an ice-crushing blender?
Clean drink residue promptly and handle removable blades with care. Unplug the base before disassembly, and follow the manual for each part's cleaning method.
The BN701 pitcher and blade assembly, BL660 removable parts, BL610 pitcher, and BR201AMZ containers, lids and blades specify top-rack dishwasher care. The BP201 has dishwasher-safe parts; confirm its placement instructions before loading them.
Don't leave a blade assembly hidden under cloudy water or other dishes. Keep it visible and use its designated grip area when moving it.
Rinse sticky fruit, milk or syrup residue before it dries around the lid and blade area. Use a brush only as directed, keeping your fingers away from cutting edges.
Wipe the motor base according to its care instructions and keep it out of water and the dishwasher. Let washed parts dry fully before reassembly or enclosed storage.
Check the pitcher, lid and blade assembly regularly for visible damage. For a fuller cleaning routine, see how to clean a Ninja blender.
Which ice-crushing blender should you choose?
Choose the BN701 as the best blender for crushing ice when frequent pitcher drinks and preset routines are your priorities. Choose the BL660 when switching between shared batches and portable individual drinks will be part of everyday use.
Pick the BL610 if you want manual pitcher blending without cup accessories. Choose the BR201AMZ when a dedicated Crush cycle and manual adjustments both matter, or the BP201 when you prefer fewer speed choices.
Before ordering, settle three things: your usual batch size, where the blender will live and whether you'll use a preset or personal cups. Then compare the Ninja models explained if you need help separating similar names and accessory packages.
Our top 3 picks at a glance
-
1
-
2
-
3
Frequently asked questions
What makes a blender good for crushing ice?
Choose a blender designed for ice, with controls and a container suited to your usual recipe size. All five picks use Total Crushing blades or technology.
The main buying differences here are automated cycles, manual control and included personal cups.
Follow the instructions for each container's permitted ingredients and fill limits.
Can a blender crush ice without liquid?
Crush ice without liquid only if your model's instructions allow it, using the specified container and quantities. Plain crushed ice and a frozen drink need different approaches.
Don't assume instructions for the large pitcher also apply to a personal cup, and never use dry ice in place of ordinary water ice.
Is more wattage always better for crushing ice?
No, wattage alone doesn't establish which blender will crush ice best. Blade design, ingredient movement, batch size and controls also matter.
The BN701's figure is labeled peak watts, so it isn't a direct comparison with the other motor figures.
Choose useful features before treating the largest number as the winner.
Which blender is easiest to use for frozen drinks?
Choose the BN701 if you want several timed preset options for pitcher drinks, or the BR201AMZ if you mainly want a dedicated Crush cycle. Both use Auto-iQ patterns of pulsing, blending and pausing.
You still need to load the right ingredients, secure the lid and follow the recipe's quantities.
How do you clean a blender after crushing ice?
Unplug the blender, empty it and clean the removable parts according to its manual. Rinse drink residue before it dries, and handle blade assemblies by their designated grip areas.
Keep the motor base out of water and the dishwasher.
Dishwasher placement and permitted cleaning methods depend on the specific part and model.